
The serpentine belt on your Honda Civic plays a key role in driving multiple engine components. A properly functioning serpentine belt ensures that accessories such as the alternator, air conditioning compressor, and power steering pump operate smoothly. Checking the belt’s condition periodically is crucial for preventing unnecessary repairs.
If you notice unusual noises like squealing or the belt slipping, it may be time to inspect or replace it. A worn serpentine belt can lead to overheating, power steering failure, or even engine damage. Understanding the layout of the belt system helps in troubleshooting any issues you may encounter with the engine accessories.
Refer to the specific diagram for your model year to identify belt routing and the correct placement of pulleys. Always ensure that the belt is correctly tensioned, as improper tension can cause premature wear or even breakage. Regular maintenance will help you avoid unexpected breakdowns and keep your Honda Civic running smoothly.
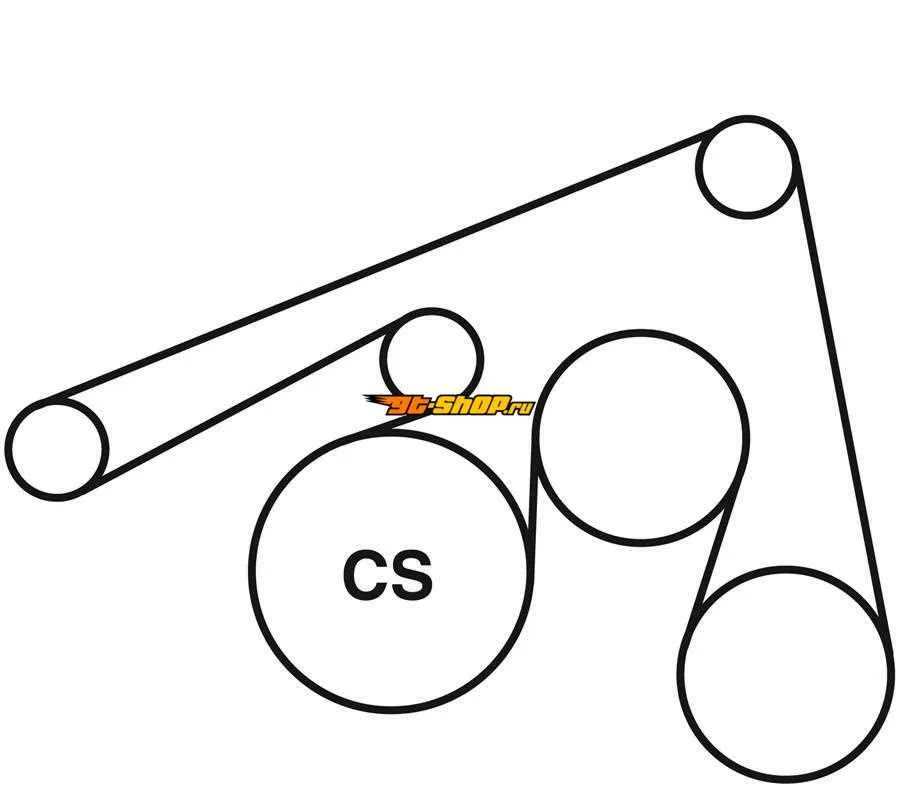
Honda Civic Serpentine Belt Diagram
The serpentine belt in a Honda Civic plays a crucial role in driving multiple engine components like the alternator, power steering pump, air conditioning compressor, and water pump. To ensure these parts operate smoothly, it’s important to follow the proper routing shown in the serpentine belt diagram.
Locate the diagram under the hood of your Honda Civic, usually near the front of the engine bay or on the underside of the hood. This diagram provides a clear view of how the belt should be routed around the pulleys and accessories. Check the belt tension regularly, as too much slack can lead to belt slippage or damage.
Before replacing the serpentine belt, ensure the engine is off and cool. Loosen the tensioner pulley using the appropriate tool, then remove the old belt. Compare the new belt with the old one for correct size and installation. Once the new belt is in place, verify that the routing matches the diagram precisely.
If you notice unusual noises or poor performance from any accessories, inspect the serpentine belt for signs of wear, such as cracks, fraying, or glazing. These issues can cause inefficient operation or damage to the engine components. Replace the belt as needed to avoid further damage.
How to Read the Serpentine Belt Diagram for Honda Civic
To read the serpentine belt diagram for a Honda Civic, follow these steps:
- Identify the Belt Path: The diagram shows the path the belt takes around various components like the alternator, power steering pump, air conditioning compressor, and the crankshaft pulley.
- Understand the Pulley Layout: The diagram will indicate the location of each pulley. Each pulley has a specific function, and understanding their placement ensures proper belt routing.
- Check for Tensioner Placement: Most diagrams include a tensioner pulley. This pulley maintains the belt tension and may require adjustment during belt replacement.
- Direction of Rotation: Arrows on the diagram show the direction in which the belt should rotate. This helps when installing the belt to ensure it aligns correctly.
- Component Details: Look for notations on the diagram that specify whether a pulley is grooved, smooth, or a special type like an idler pulley.
By following these key points, you can easily interpret the serpentine belt diagram and ensure proper installation and belt maintenance.
Common Issues with the Serpentine Belt on Honda Civic
Wear and Tear is one of the most common issues with the serpentine belt. Over time, the belt can become cracked, frayed, or stretched, causing it to lose its grip on pulleys. Regularly inspect the belt for visible damage or signs of aging.
Squealing Noises often occur when the serpentine belt is slipping. This can happen due to misalignment or when the belt is too loose. If you hear squealing sounds, check the belt tension and ensure it’s properly aligned with the pulleys.
Loss of Power in accessories like the alternator, power steering pump, or air conditioning can indicate a worn-out serpentine belt. If the belt fails, it may not transfer power to these components, leading to performance issues. Replacing the belt before it fails completely can prevent this problem.
Overheating is another symptom of a faulty serpentine belt. If the water pump, which is driven by the serpentine belt, stops working due to belt failure, the engine can overheat quickly. Pay attention to temperature gauge readings to prevent engine damage.
Cracking or Drying Out of the belt surface can occur due to exposure to heat and friction. It’s essential to replace the belt if you notice surface cracks, as this can lead to sudden failure while driving.
Increased Vibration may signal that the serpentine belt is loose or worn unevenly. If you notice unusual vibrations in the engine, inspect the belt and pulleys for proper tension and alignment.
Step-by-Step Guide to Replacing the Serpentine Belt on Honda Civic
1. First, locate the serpentine belt routing diagram. It’s typically found on a sticker near the engine bay or in the owner’s manual. This diagram helps you understand the belt’s path and the position of the pulleys.
2. Use a wrench or ratchet to release tension from the tensioner pulley. This will allow you to remove the belt from the pulleys. Turn the tensioner clockwise or counterclockwise, depending on the model.
3. Once the tension is released, carefully slide the belt off the pulleys. Keep track of its routing to ensure correct installation of the new belt.
4. Inspect the pulleys and tensioner for any signs of wear. If any pulley feels rough or wobbly, replace it before installing the new belt to avoid future issues.
5. Position the new serpentine belt following the routing diagram. Make sure it sits properly in each groove of the pulleys. Double-check the alignment before proceeding.
6. Use the tensioner to apply tension to the new belt. Make sure the belt is tight but not overly stretched. It should move slightly with manual pressure, but not be loose.
7. Once the belt is securely in place, rotate the engine manually by turning the crankshaft pulley. This ensures the belt is seated correctly and runs smoothly.
8. Start the engine and observe the belt’s operation. Listen for any unusual sounds, and check if the belt is properly aligned and running smoothly across the pulleys.
9. If everything checks out, the replacement is complete. Ensure the belt is functioning properly by monitoring the performance over the next few days.